Have you been thinking about starting a blog? You should give blogging a try, as it has many benefits! I created this free how-to-start-a-blog guide because so many readers have asked how to get starting blogging. They say it’s overwhelming, so they’ve marked it as a “someday” thing and put it on a dreams shelf. Well, I want you to pull blogging off the shelf and make it happen! I bet you have great things to share. You’ll enjoy the process and maybe even make some money!
So, I am happy to help! I’ve been blogging since 2009. Amazingly, I am now in the blogger-for-a-decade club. And if I can do it and love it, you can, too!
Let’s cover some basics first.
What is a blog?
A blog is a platform for sharing content on the web. It is a website that is updated frequently and is often written in a conversational voice. While most people associate blogs with individuals, blogs are also managed by companies and organizations.
Why should you blog?
Blogging can be very healing – in the same way that journaling can be. Blogging can motivate you and provide accountability to achieve your goals. It can also connect you with other like-minded people and those who’ve shared similar life experiences.
In 2009, I was suffering through an extreme depression. I realized that my mother’s substance use disorder had deeply affected me. As an adult child of alcoholic (ACoA), I had a lot of healing to do. I went looking for fellow ACoAs blogging about their experiences and healing processes. I found next to none. So, I started blogging and became one of the world’s first ACoAs to blog consistently about that topic. I felt very called to blog about this topic since I’d discovered that I am among millions and millions of ACoAs. Sharing about what I learned was – and continues to be – very cathartic! I’ve also been so inspired by the hundreds of people I’ve connected with, worldwide. Blogging about this topic is a way to pay it forward.
Whatever your topic is, someone is looking for it!
How do you know what to blog about?
Blogs are written about virtually every topic imaginable. People often say they don’t know what to blog about because it seems that for every good topic, there are already a zillion blogs about it. When you get started with blogging, just blog about what you want to read about. I promise that over time, you’ll know exactly what to blog about.
Write the blog you go looking for and cannot find. Your blog will be unique because you bring unique perspective and experiences.
How to start a blog
The most important blogging tip is that you don’t have to have it all figured out. If you keep waiting for the perfect plan for your blog or the ideal circumstances to become a blogger, you’ll never actually begin! Just get your blog site up and start blogging! You can literally start a blog in under an hour.
I challenge you to stop waiting and get blogging before you put it off any longer. The world needs your voice!
How to set up a blog quickly
5 steps to start a blog
- Set up your blog through Bluehost.
- Get started with the WordPress blogging
platform. - Create a few basic blog website pages.
- Publish your first blog post.
- Launch your blog!

1. Set up your blog through Bluehost.
Important disclosure: I am an affiliate for Bluehost, so I will earn a commission if you choose Bluehost to host your blog. The bonus for you is that there is great pricing and free domain name registration through my affiliate referral link.
To start a blog, you need:
- A company to host your blog, safely and
securely. - A blogging platform to make creating and managing
content easy.
First, pick a company to host your blog. This company is responsible for keeping your blog up and running and storing all the content and data, safely and securely. Bluehost is one of the world’s most trusted and leading website and blog hosting providers. I recommend them for two primary reasons:
- Superior uptime: Bluehost has hosted
JodyLamb.com and my other websites since 2009. Bluehost is fantastic! I didn’t
realize just how great they are until I worked with other website hosting providers
for projects at my job. Yeesh! That was eye opening. Bluehost’s uptime (time your
blog is smoothly up and running) is far superior to their competitors; this
means that with Bluehost, you won’t have to worry about your blog suddenly crashing
and being unavailable for your readers. - Stellar customer service: Bluehost’s customer
service has consistently impressed me. I am not a tech person and I’m quick
to feel frustrated when it comes to technical-related woes. Every time I’ve
screwed something up with my blogs that affected hosting (i.e. such as the two
times I installed a new design theme and failed to follow the instructions
correctly!), the Bluehost customer service team has been clear, concise, patient
and helpful by email and chat.
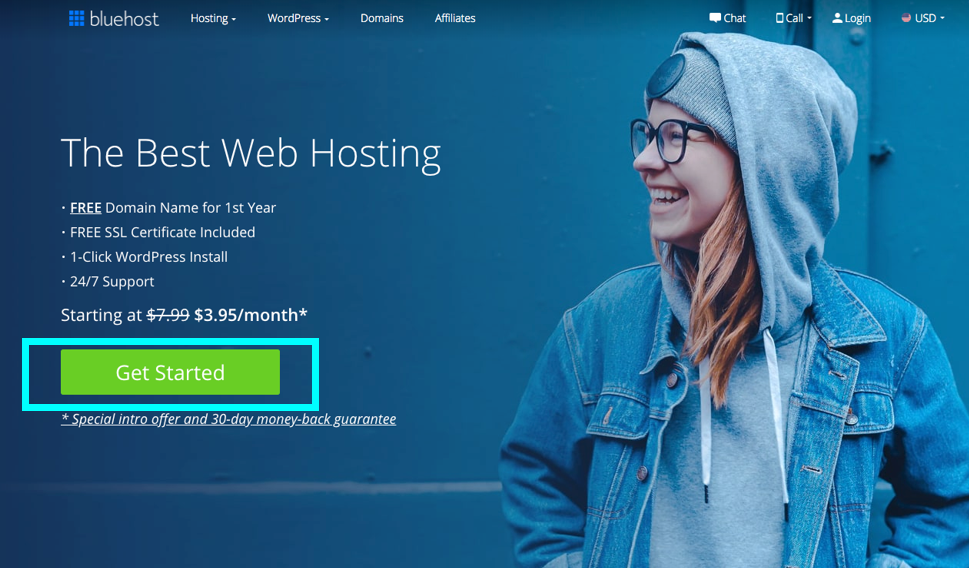
Click here to go to Bluehost. Then click on the green Get Started button.
If you are using a mobile device, it may look a little different than my desktop view screenshots, but the functions are the same!😊
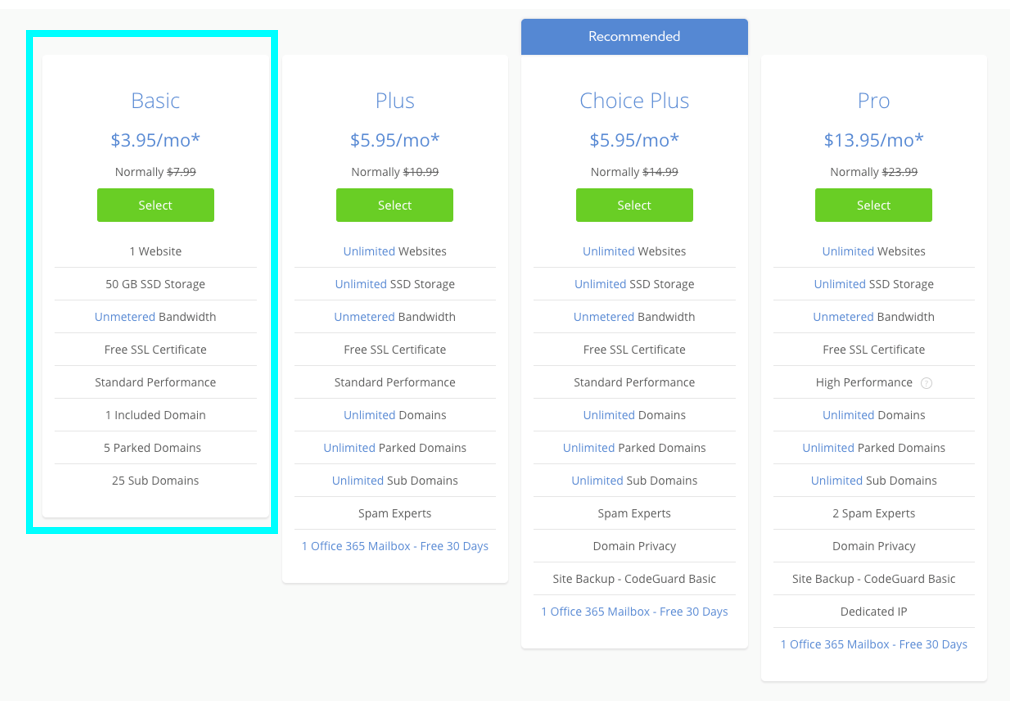
Select a plan by clicking on one of the green Select buttons.
I recommend starting with the basic plan. You can always upgrade to another plan later when you need more features.
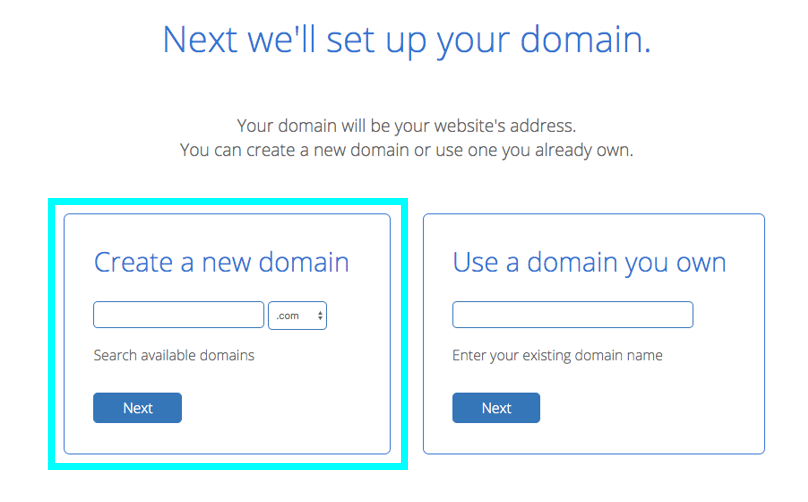
Enter your domain name.
Your domain name will be your blog’s website URL. The domain name for this blog is JodyLamb.com.
If you do not have a domain name, key in your desired domain name and then click on the blue Next button. Bluehost will then do a search to make sure no one else already owns that domain. Note: You have the option to use a different URL extension (.com, .net, etc.). For example, if someone already owns YourName.com, it may be available as YourName.net. You can select a different extension by clicking on the extension dropdown menu; the default search will use “.com,” since that’s the most commonly searched one so you need to select an alternative from the menu and then hit the Next button to have Bluehost search for the domain using that extension.
If you already registered a domain name through GoDaddy or another domain registration provider, enter it through the “Use a domain you own” option. Set up is a little more complicated in that case. To keep this guide straightforward, I’m assuming you do not have already have a domain.
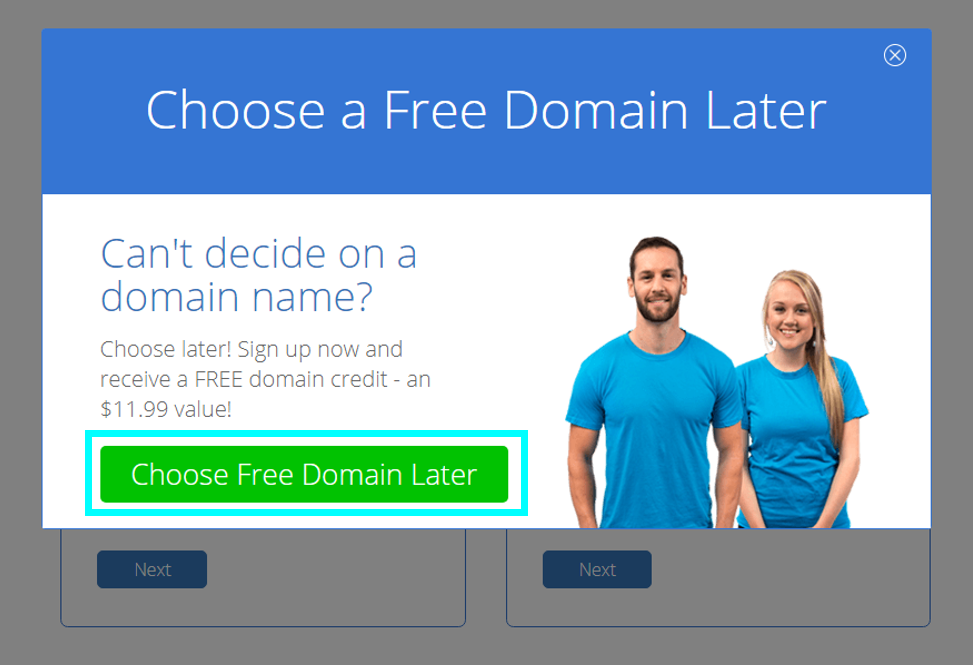
If you are unsure what you want the domain to be, you have the option to skip that step and create a domain later. If you stay on this step for a few seconds without doing anything, a “Choose a Free Domain Later” window will pop up. Click on the green Select a New Domain Later button to select your domain later in the process. However, it’s easier to take care of this now, though. Remember, don’t overthink it!
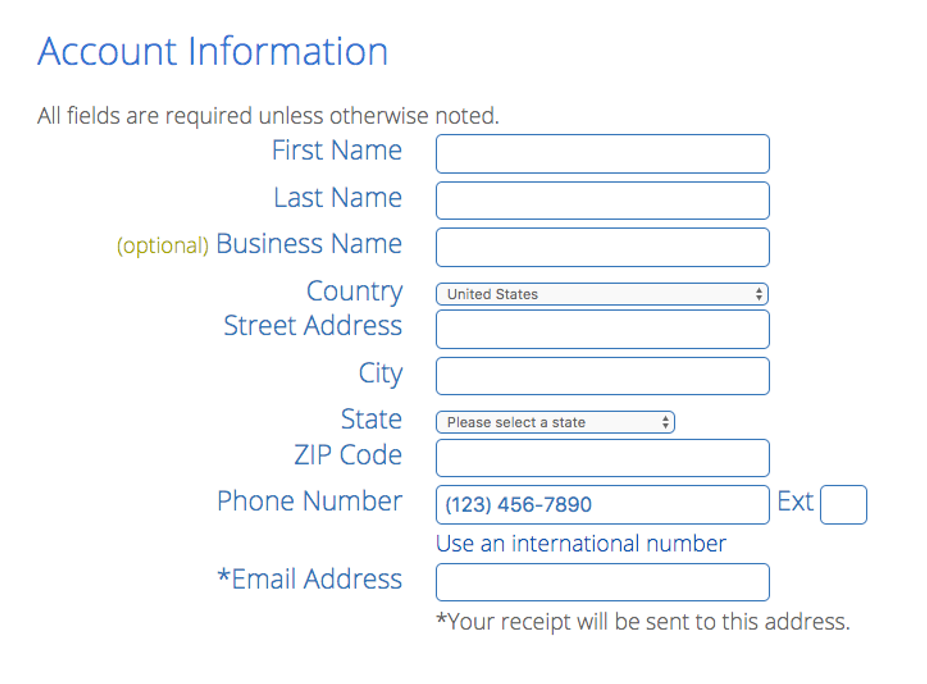
Create your Bluehost account.
Enter your contact information. You can also use your Google account to make it easier.
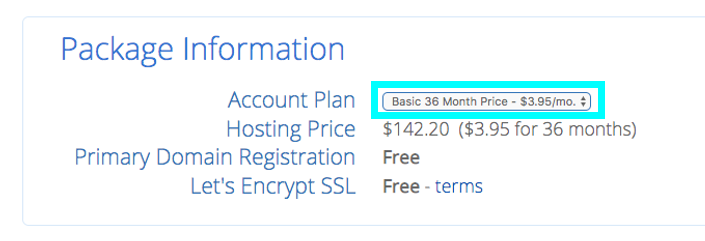
Select a “package.”
Bluehost offers three packages: hosting of your blog for one, two or three years. The price per month for each package option will be shown but you will pay the total package amount today. Click on the Account Plan dropdown menu and choose the best option for you. For just a few dollars per month, you can skip one fancy coffee and be a blogger. Note: Other website hosting companies offer pay-by-the-month options but the total cost per year is higher than Bluehost and their reliability and customer service can’t hold a candle to that of Bluehost, in my opinion. Also, Bluehost offers a 30-day, money-back guarantee. Choose the package that best fits your budget.
Then select “package extras.”
I suggest that you skip all extras for now EXCEPT domain privacy. Domain privacy ensures your contact information associated with your domain is not publicly visible. Don’t skimp on this! If you selected the basic plan, you’ll need to add the domain privacy extra by clicking on the checkbox next to it. If you selected another plan, it may already be included at no additional cost. The other extras are unnecessary, in my opinion, for beginner bloggers so make sure the checkboxes for those are unchecked.
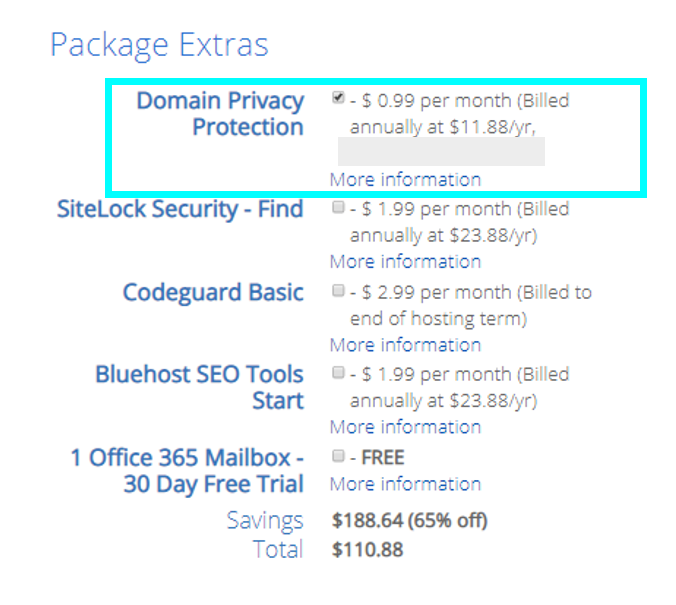
You won’t see these “extras” options if you chose “choose your blog domain later” or if you already had a domain registered before you created your Bluehost account. Bluehost will ask you about this later.
Next, enter your payment information.
Enter your payment information, click on the checkbox and click on the green Submit button.
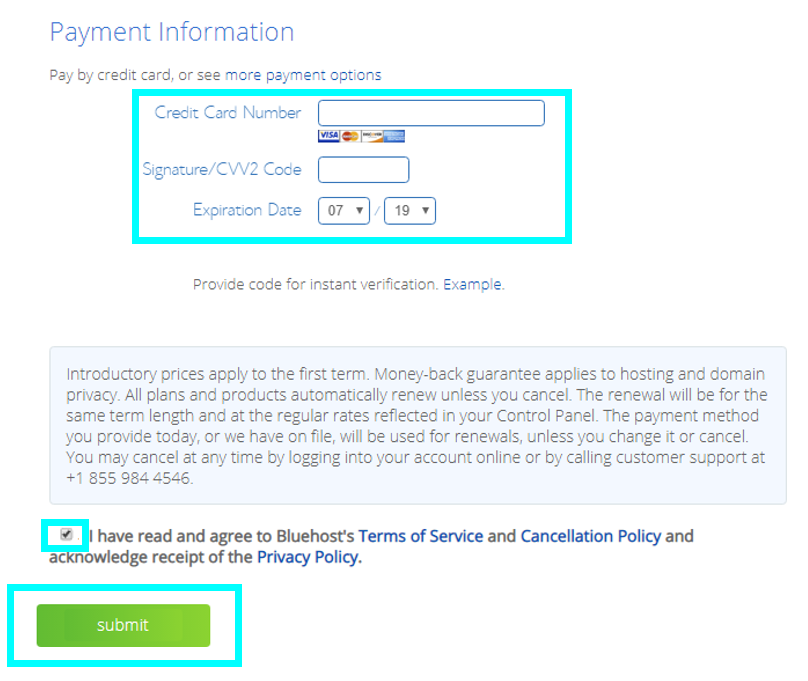
Create Bluehost account.
You’ll then see this successful-purchase confirmation page. Click on the blue Create Account button.
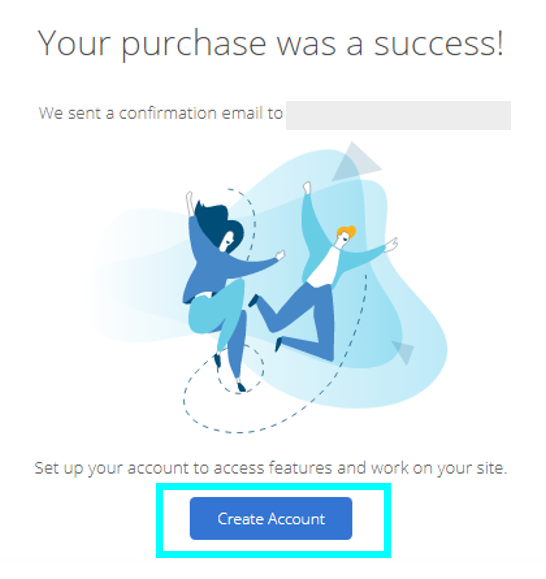
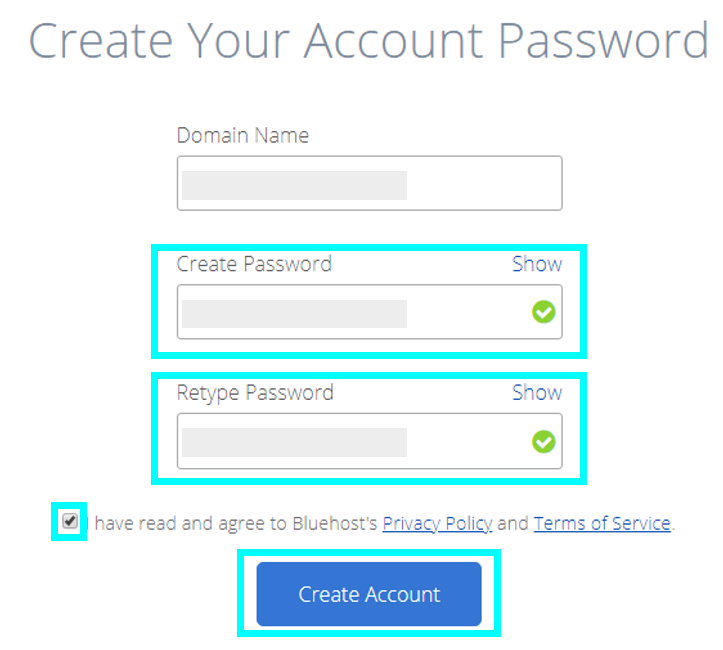
Create a Bluehost account password.
Enter a password and repeat in the second password field. This is the password you will use to log into your Bluehost account going forward. Be sure to create a strong password with a combination of letters, numbers and special characters. Click on the Terms and Privacy checkbox and then click on the blue Create Account button. Record your password somewhere safe. You’ll need it in a few seconds.
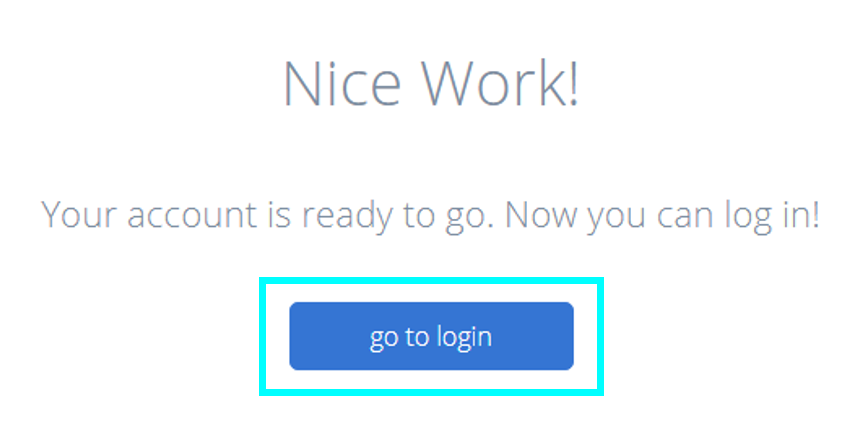
Next, click on the blue Go to Login button.
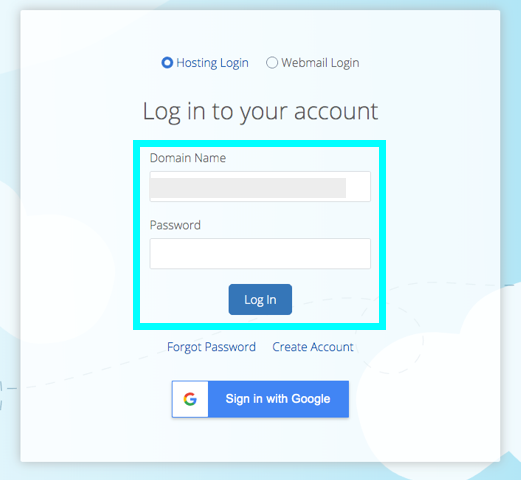
Enter your Bluehost account login information.
Enter your domain name and the password you just created (or sign in with Google, if that’s the option you prefer). Then, click on the blue Login button.

2. Get started with the WordPress blogging platform.
Here comes the exciting part. You will create your blog website!
There are a few major platforms for bloggers. A blogging platform is a website content management system, which makes it easy for you to create and publish blog posts and other content. I recommend the WordPress.org platform for a few reasons:
- It’s easy to use. No technical skills are
required to create and publish posts in WordPress. - There are abundant free and low-cost design
options. There are so many amazingly good-looking WordPress design “themes”
available with a few clicks. You can pick a design “theme” that is just right
for your blog. - It’s highly scalable. WordPress.org will grow
with you. Most blogs and websites in the world are built on the WordPress
platform for good reason. WordPress blogs can be as simple or as elaborate as
you want them to be. When you start out with WordPress, it will be waaaay
easier down the road when your blog has a huge fan base and you want to add
many bells and whistles and functionality to your blog.
Tip: Don’t confuse WordPress.org with WordPress.com. In this guide on how to start a blog, I recommend hosting by Bluehost and content management by WordPress.org. This is a great combination that offers great flexibility and scalability for the future. So, what is the difference between WordPress.org and WordPress.com? If you set up a blog with WordPress.com, WordPress.com will be your blog hosting provider and your blogging platform. I do not recommend this because WordPress.com design and functionality options are very limited. Also, you won’t be able to easily make money from your blog in the future if it’s on WordPress.com. Also, it’ll be a hassle to move to WordPress.org or another blogging platform when you’re ready to do so.
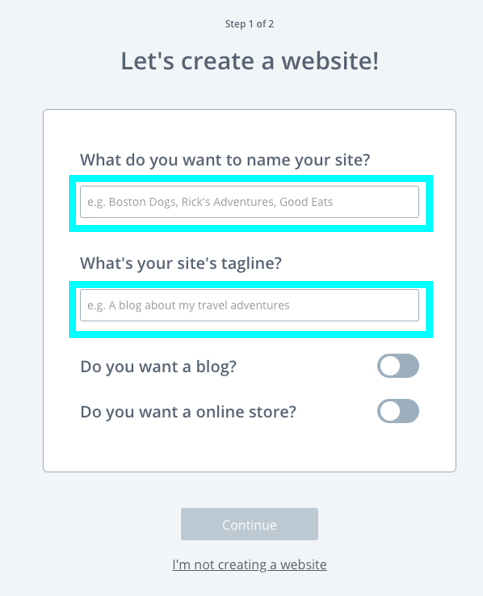
Create your blog website.
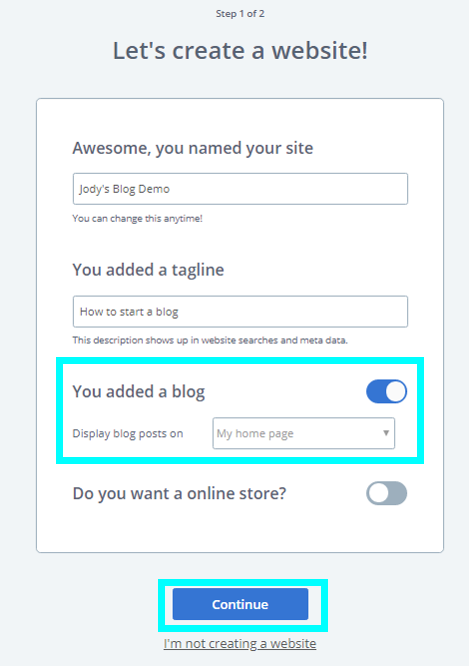
Enter a name for your blog. Example: Maggie’s Awesome Blog. This name does not have to match the domain name. For example, the domain for this blog is JodyLamb.com but the blog name could be Jody Lamb’s Blog. You can change this at any time in your WordPress settings.
Next, add a tagline to tell the internet what your blog is all about. This will help people find your blog because the search engines pay attention to these keywords and will direct readers to your blog when there’s a match with what they searched for!
Tell Bluehost what your goals are with your blog.
Select the checkbox next each goal that applies to your blog and then select your comfort level with creating websites (select “a little” if you are very new to all of this!). Then, click on the blue Continue to the Theme Selection button.
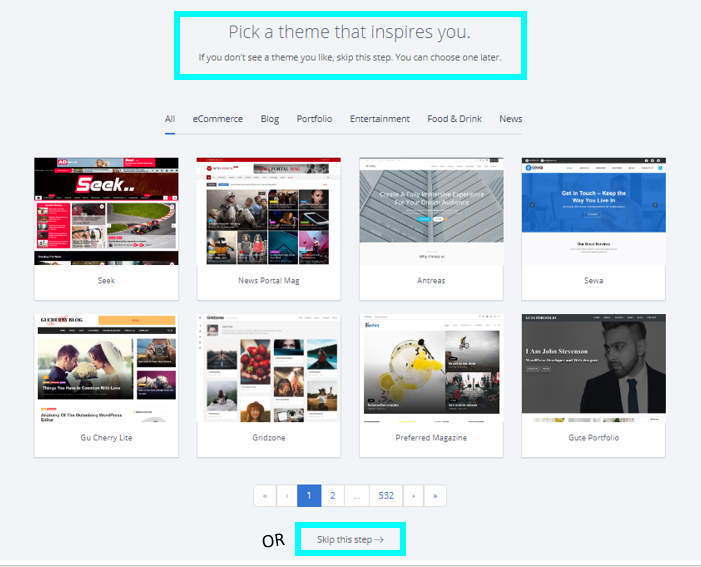
Select a design theme for your blog or wait until later.
The look and feel of a WordPress blog is defined by the selected “theme.” There are literally tens of thousands of themes for WordPress blogs. Some are free. Since you’re just getting started with blogging, you should consider just selecting a simple, free one for now. Later, when you’re on a blogging roll, you should consider purchasing a premium theme you love. Free themes are said to be more vulnerable to “bugs” and other issues because they are not maintained with updates compared to premium ones you actually pay for.
TIP: Avoid what I call the blog theme rabbit hole. It is sooo easy to get caught up in perfecting the design of your blog. I’ve spent DAYS searching for the perfect theme and then tweaking it for hours on end. Don’t make this mistake. You can also get lured into dishing out major cash for a custom theme for your blog. This is like buying an upscale restaurant and opening before you’ve hired a chef or purchased any appliances or food to serve your patrons. Start simple. People will visit your blog because they’re interested in you and what you share with them. They won’t care about the design. Also, the more theme bells and whistles your blog has, the more there is to malfunction. You don’t want broken things on your blog when you’re trying to build your readership.
Browse through free themes in the gallery. If you find one you like, click on the image to select it. If you’d prefer to wait until later, select “Skip this step.”
You’re now a blogger on WordPress! Get your blog ready to launch.
Whether you select a theme now or not, WordPress will now proceed with creating your WordPress blog! Woohoo! You’re a blogger now.
Click on the blue WordPress button. Bluehost will take you to WordPress, where you will customize your WordPress settings and get the blog ready for launch.
If anyone visits your domain at this point, they’ll see a Coming Soon message.
Note: When you create a new domain, it may take up to 24 hours to be fully registered in the internet world. In the meantime, Bluehost will give you a temporary domain to use so you can keep going with your setup stuff. When the new domain is fully registered, Bluehost will switch it automatically.
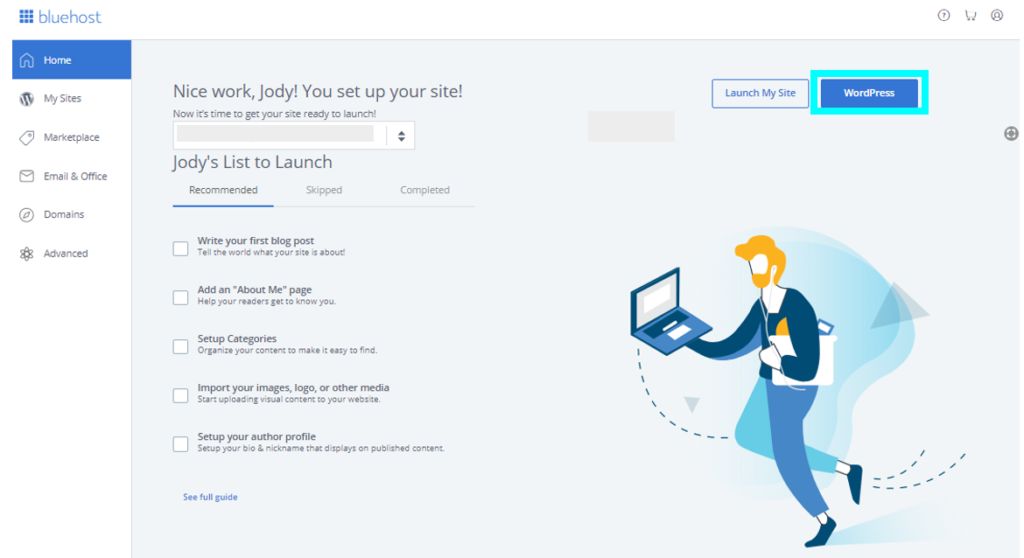
Note: you can always access WordPress through Bluehost, but you can also log into WordPress by just adding “/admin” to your domain. That’s yourawesomedomain.com/admin. Just replace “yourawesomedomain.com” with whatever your actual domain is.
Update important stuff in WordPress.
Within WordPress, you’ll spend the most time navigating around the black menu on the left. These are your controls.
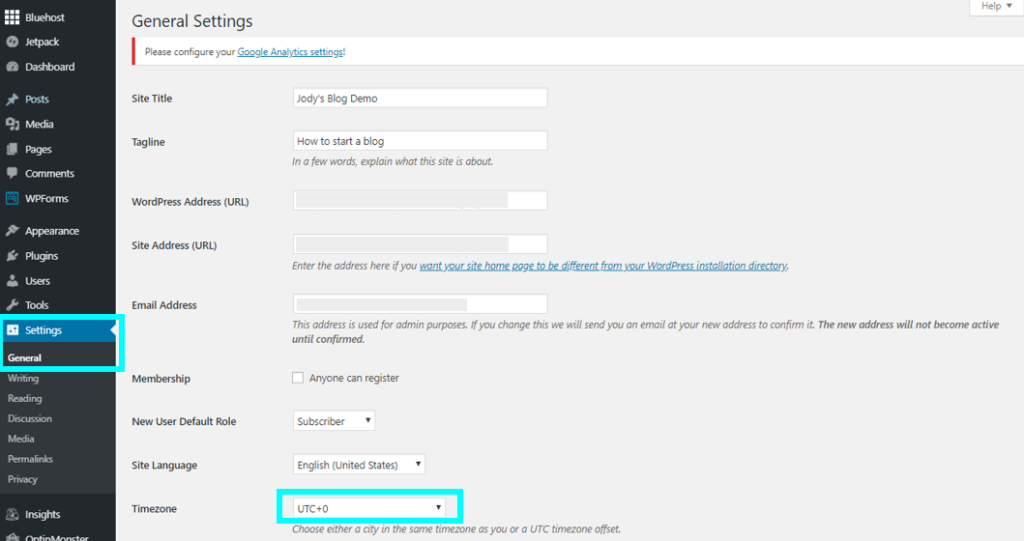
Update your time zone.
In the General section, click on Settings. Update the time zone to the time zone in which you do your blogging by selecting your time zone from the dropdown menu. IMPORTANT WARNING: Do not change the WordPress Address (URL) or Site Address (URL) or anything else besides time zone in this General section; if you do, you’ll have major problems!


3. Create a few basic blog site pages.
Every blog should have a couple of standard pages in addition to blog posts. I recommend that you create the following pages:
- About
- Contact
- Privacy Policy
Do you really need an about page? Yes! When you start blogging, people will want to know more about who you are. Of course, you can always blog anonymously or with a pen name but an About page will be appropriate in those situations, too. Readers will head there to learn more about you and see whether they want to read your posts or not.
How to create a new page on your blog
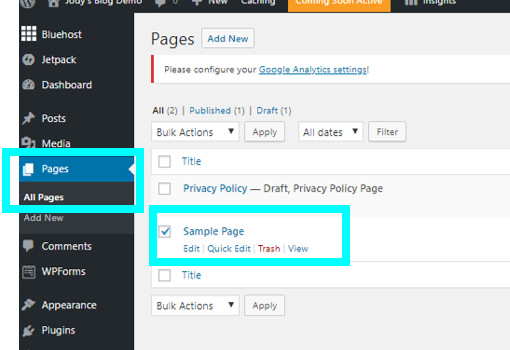
First, delete the sample page. Out of the box, every WordPress blog comes with a sample page. You can delete it in one click. Go to Pages, then hover over the Sample Page and then click on Trash.
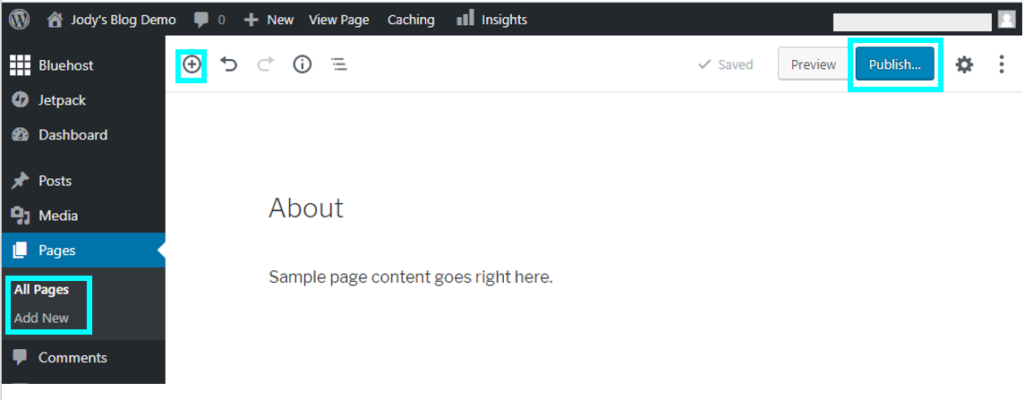
Next, in the Pages section, click on Add New. Enter a page title in the title section and then more text in the box beneath it. Click on the plus icon in the upper left corner to add other “blocks” such as more text boxes, images or other elements. Then click the Publish button when you’ve added all the content you want for that page.
How to add pages to blog’s main menu
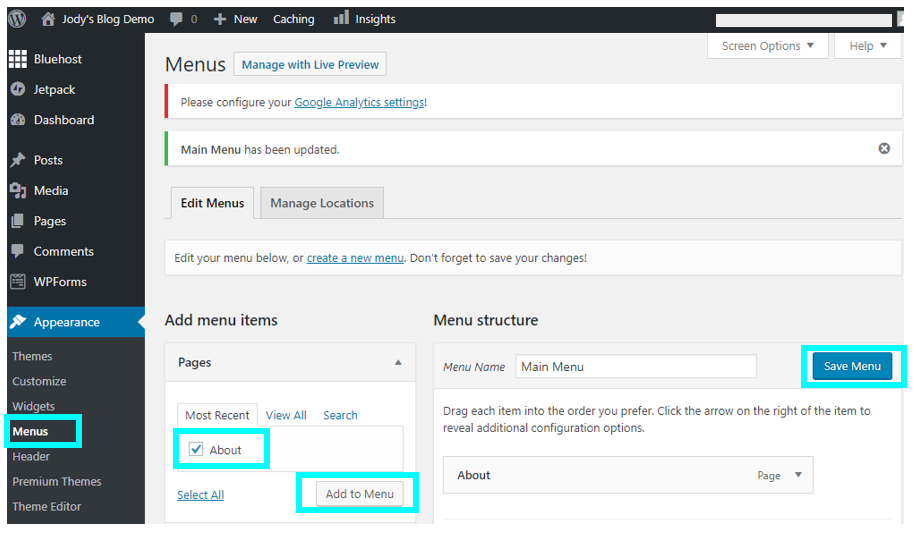
To make your pages appear on the main menu on your blog, go to Appearance < Menus. Create a menu on your blog by giving it a name (Main Menu will do) and then click on the Create Menu button.
Then click on the checkboxes next to the pages you published and want to add to your main menu. Then click on Add to Menu button and then click on the Save Menu button. Those pages will then appear on the main menu once you’ve launched your blog.

4. Create your first blog post.
Now, go to the Posts section. Click on All Posts. Hover over the Sample blog post and click on the Trash option to delete it.
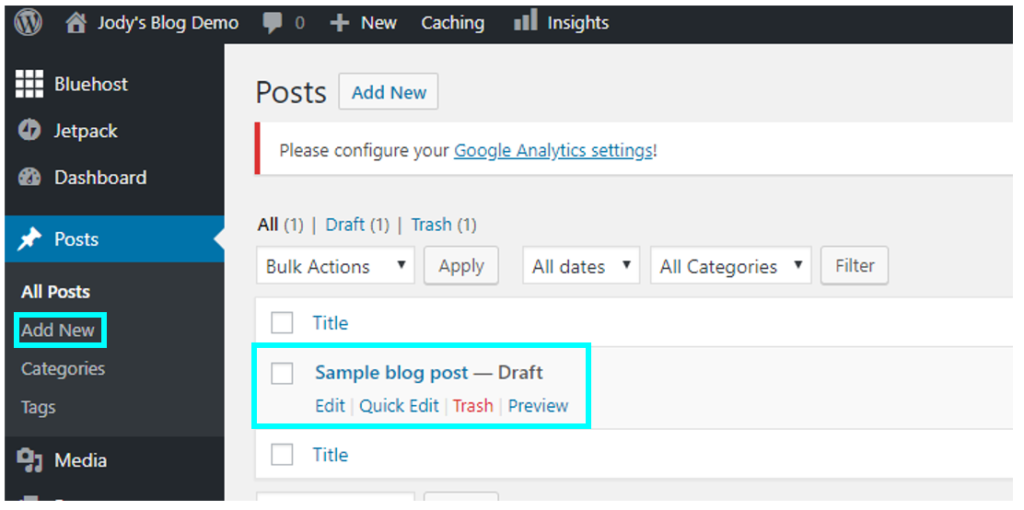
To create your first blog post, click on the Add New option in the Posts section.
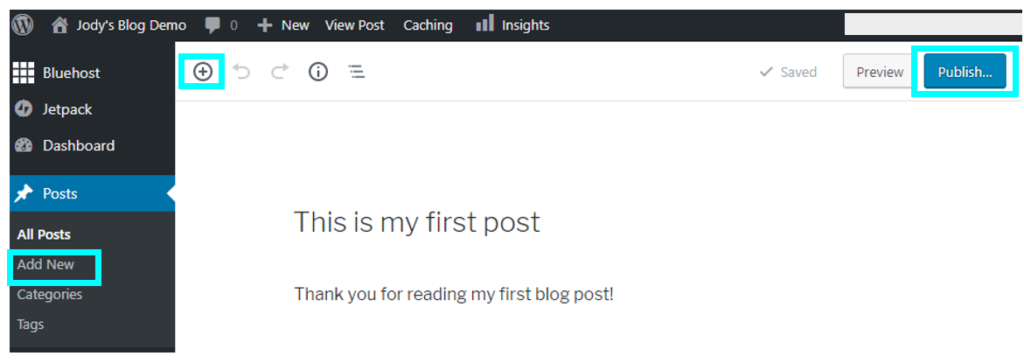
Enter a blog post title and then add more text in the box beneath it. Click on the plus icon to add other “blocks” such as more text boxes, images or other elements. Then click the Publish button.

5. Launch your blog!
Now it’s time to share your blog with the world.
If you did not select a theme in the setup process, you should do that now. Go to Appearance > Themes. You can browse through themes by clicking on the Add New Theme button. Hover over a theme image and select it by clicking on the Activate button. You can also upload a zip file of a purchased theme. Follow the instructions from the theme seller to do that.

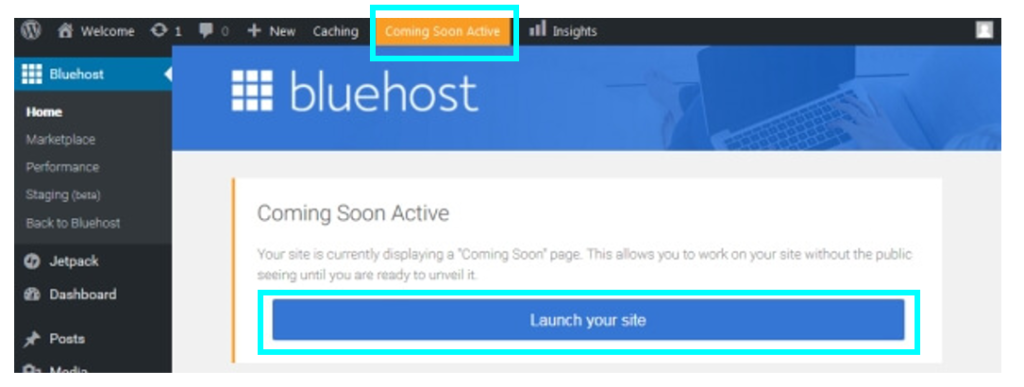
When you’re ready to launch your blog, go to the orange Coming Soon Active link in the upper menu in your Bluehost account and then click on the blue Launch your site button.
Remember, you can always access WordPress through Bluehost, but you can also log into WordPress by just adding “/admin” to your domain. That’s yourawesomedomain.com/admin. Just replace “yourawesomedomain.com” with whatever your actual domain is.
That’s it! Your blog will now be live! I wish you great success with your blog! If you found this post helpful, please consider sharing it.

